Showing posts with label Spinner Square Pop-up. Show all posts

Saturday, September 1, 2018

Woodland Wonderland

This was a FUN project! As I lay in bed this morning, I kept seeing little fairy woodland type houses in my head!  Well, we all know what that means!  Get out of bed and make a card!  YeeHaw!  I love it when my day start out like this!


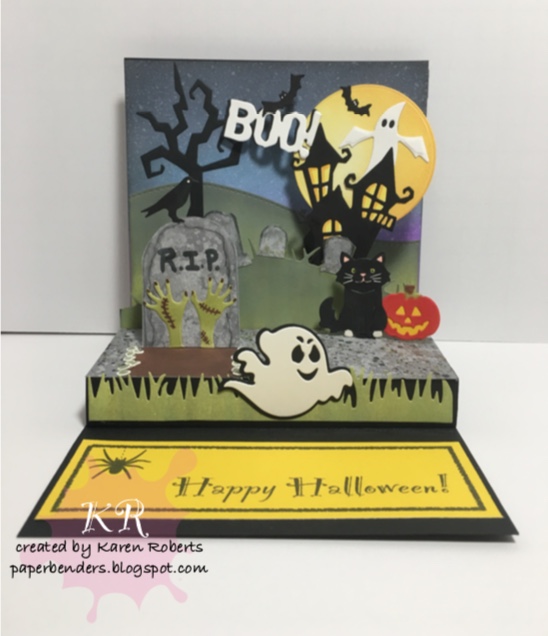
I kept the front very simple.  It's a 4 1/4" x 5 1/2" card base.  To this I glued some pattern paper leaving a small border around the edge.  I did a sentiment using an old stamp and the banner die from the Ups Daisy Pop-up set.  I mounted this on a piece of card stock the same color as the base of the card.  I then made this dimensional by mounting it with fun foam.  


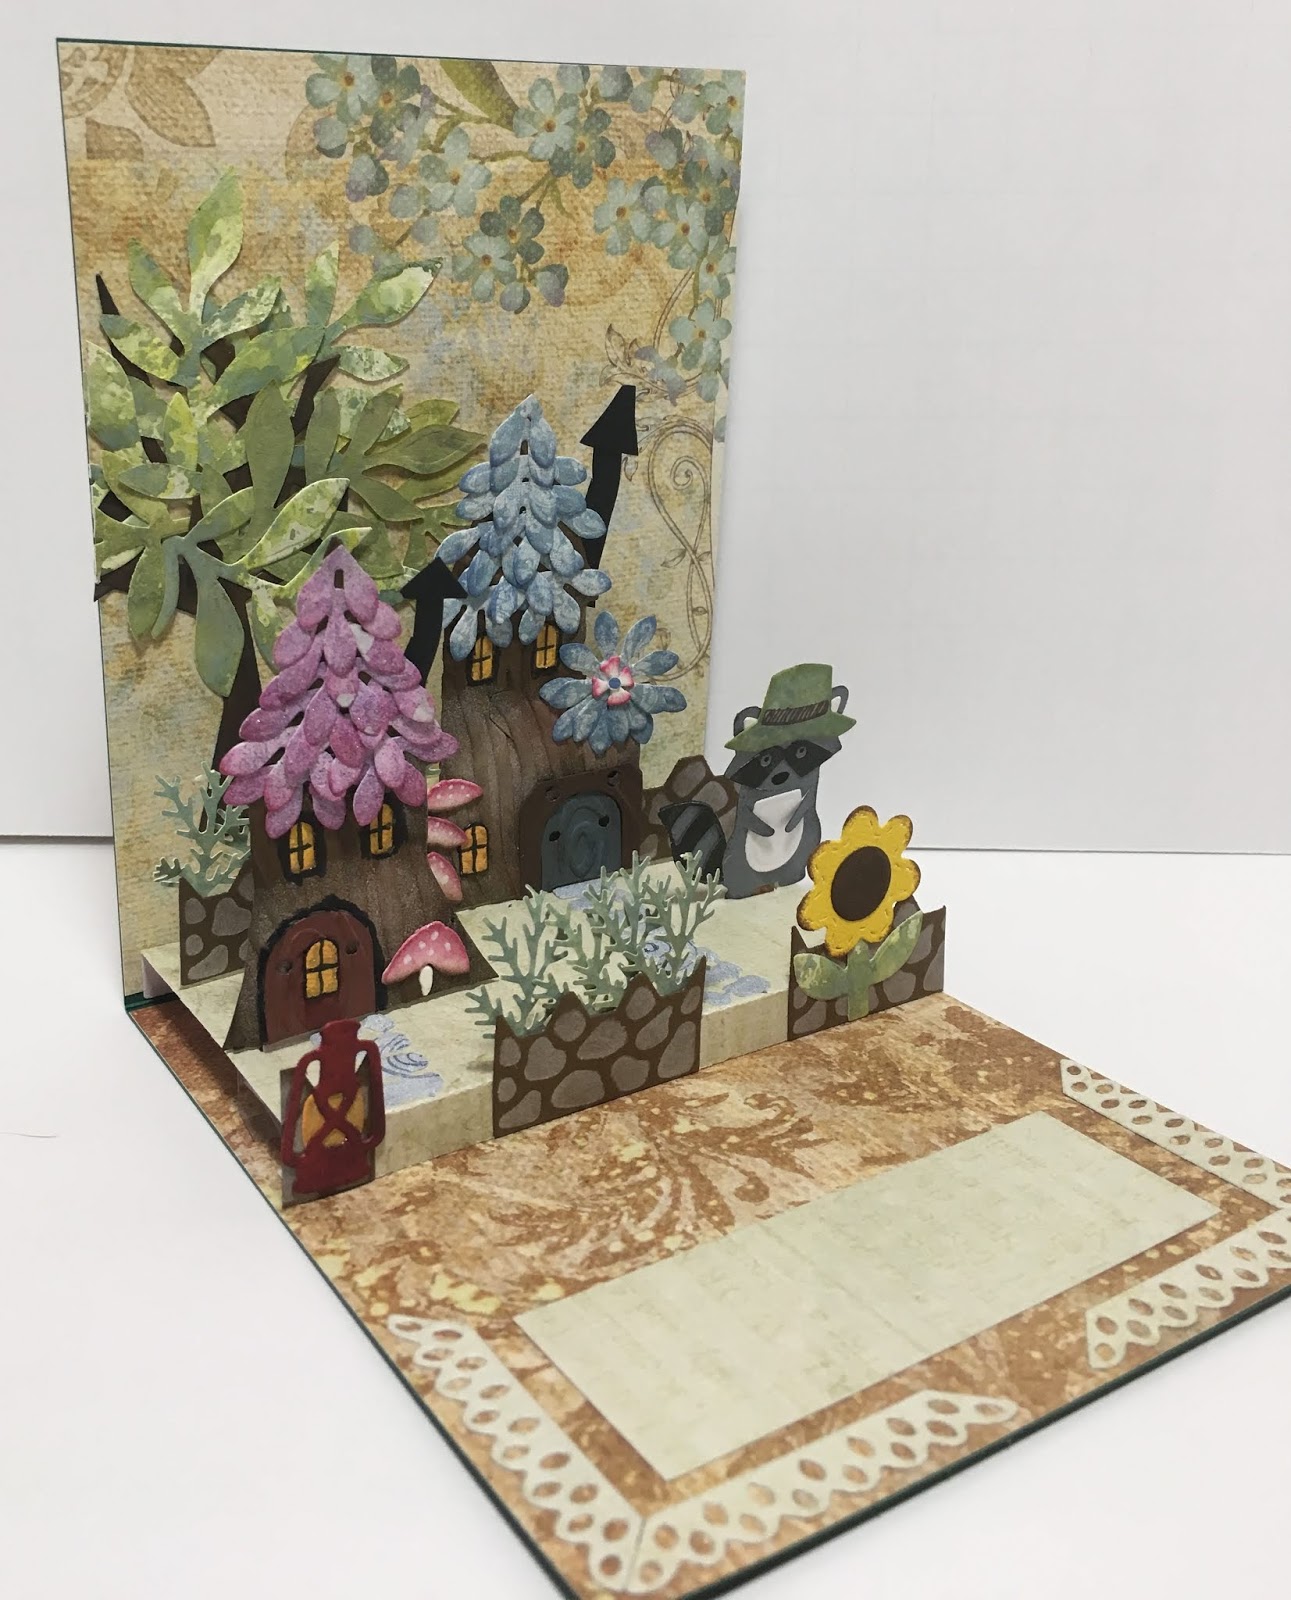
 Let's start with these babies!  As you can probably tell, these started out as parts of the castle pop up set.  See the drawbridge?!  First, I die cut the castle piece.  I cut it into 2 sections making use of the two turrets.  

I then ran them thru a wood grained embossing folder.  I distressed them with ink, glued some yellow behind the windows, and attached the doors.  

Then I cut out another castle to use as a backer piece for the houses and glued it to the back of the houses. 

Next, I cut out flowers from the ups daisy set (the smaller one).  I inked the edges, then cut them in half.  I used these pieces for the shingles on the roofs.  I layered them up starting at the bottom of the roof and working upwards.   

I hand cut a chimney for each house, and glued it to the back.  The mushrooms were random pieces of waste from die cuts.  I inked red on the top, brown on the bottoms, added some white dots, and Voila'....Mushrooms!

I added an additional flower to the right side of the blue house, and once again, using the waste from die cuts, I made a center for the flower.  


 I used random papers for the background and lower portion of the card and glued these to the card base.  I then added the floating floor from the house and fence pop up set.  

I added the houses to the various pop-up mechanism and added the stone walkways from the house and fence set.
  
The tree in the background was from the halloween scene die set.  To that I glued leaves made from the leaf die from the flower pot  set.  

The raccoon is from the woodland animals set.  The lantern and the hat on the raccoon are from the camping charms set.  The fence/wall pieces are from the castle pop up set.  The ferns on the wall sections are from a Martha Stewart leaf punch. 

All the papers for the leaves & flowers were made using distress inks, and water.  

The sun flower is from the ups daisy pop up set.


 The flourishes on the floor of the card are from the square spinner pop up set.  I used them to partially frame the area where I will sign the card.  


 So in this card I used mostly Karen Burniston dies.  I used:

1001 Woodland Animals
1049 Camping Charms
1033 Castle Pop-up
1014 Halloween Scene
1015 House and fence Pop-up
1042 Spinner Square Pop-up
1010 Flower Pot Pop-up
1047 Ups Daisy Pop-up

I also used A fern leaf punch from Martha Stewart.  

This card was a BLAST to make!  I needed this boost after finding out I didn't make the cut for the design team member position I was going after.  There is no better way to raise your spirits, than to make a card.  At least not for me! 

Happy crafting!

ttfn: Karen


Sunday, August 5, 2018

Halloween Wonderland


In my last Blog, I talked about mock-ups, and their importance in designing cards.  I  posted a picture of the mock-up design for this Halloween card.  Now you'll get to see the final results.  


This was one time I was really glad to have a mock-up to follow.  This was a complex card, in that there were multiple pop-up elements.  I had a SquareSpinner Pop-up (Karen Burniston Die), a floating floor, and a small pop-up from another one of Karen Burniston's sets.  Oh, and I turned the entire card on it's side.   


Card Front

The card front is made from a combination of die cut images, and inked images.

Inside
Left Side Detail
Here you can see most of the pop-up elements on the left side of the card

Right Side Detail
Here you can view the pop-ups from the Right hand side.


Inside Detail
Here is a close up of the detail on the top of the card.


 If you want some of the details on how this was made, you might want to grab the beverage of your choice at this time.  This might get a little long winded, but I want to be fairly detailed, that way if you're adventurous, you might be inspired to try something like this.


I did a 5 1/2" x 5 1/2" card base.

First off was the spinner card.  There are GREAT instructions from Karen Burniston on both her web page, http://karen burniston.com and also on YouTube, so I don't need to get into that here.  She explains it WAY better than I could, and you can follow along with the videos.

I inked my background paper, and glued it to a card base.  I then added a grassy hill (die cut edges, then inked with Distress Oxides). I then needed to attach the spinner mechanism.

So I created the spinner mechanism for the card, attached it about 1 1/4" from the right edge of the card.  I wanted to add another grassy hill, but needed a support on the left side, so I cut out another spinner card mechanism, and used the box portion only, and glued it to the left side of the card.  

To these platforms, I added the hill with tombstones (die cut, then inked using distress oxides and masking technique).   Pretty straight forward so far. Now comes the floating floor.  

I cut a 4 1/4" x 5 1/2"  piece of grey card stock.  On the 4 1/4" side, I scored @ 3/4", 1 1/2", &  3 1/2".  I cut a slot on the left side of the platform (for the large tombstone),  and did a diagonal pop up on the right side (behind the cat and the pumpkin). 

I attached the floating floor, then decorated it as follows:

 I inked "gravel", and "dirt" onto grey cardstock, then glued that onto the platform, lined the grave with "rocks" made from small waste pieces of a die  (I did stencil ink on the die before removing the individual pieces).  I attached the large tombstone, the cat & the pumpkin. I edged the front of the platform with grass and a ghost.  

The sentiment at the bottom was computer generated.  

Let me know what you think of this card.  It was a lot of fun to design, and assemble.  


Wednesday, August 1, 2018

Is it a Little "Chilly" out there?

Last night while I was trying to unwind and fall asleep, I was thinking about which Pop-up to make a card with next.  The last thing I saw on my desk while cleaning up for the night was a "Chilly the Penguin" character that I had left over from another card, so he was kinda fresh in my mind, and I thought maybe I could use him.

So, I climb into bed,  laying there thinking....  I managed to figure out which Pop-up I wanted to use, then thought "cool, now I can go to sleep!"  WRONG!!! My brain fired up, and  ideas just started  popping into my head!  So, I thought, "Go write them down so that then you can get some sleep."   WRONG AGAIN!!!  I got up, thinking I'd just get some of the ideas down on paper so I didn't forget them come morning.

I sketched a rough draft of the igloo, played around with Chilly a bit, then an idea for a fishing pole with fish on the end of it popped into my head.  Next thing I know is it's 2 hrs later, my eyes are bleeding cause I'm so tired, and I had built at least 1/2 of the card!

I think what I'm trying to say is...Don't expect a new blog enrty everyday,   but when the ideas are flowing I need to run with it.  Trust me, there will be dry spells!


5 1/2 by 5 1/2 card


Most of this was pretty straight forward using primarily #1042 Spinner Square Pop-up by Karen Burniston, and #1408 Reindeer by Elizabeth Craft Design for the snow flakes, trees, and hills.  Of course, there's Chilly the penguin ( a retired die by Karen Burniston).  

The stamp set was Simon Says Stamp & die set #101624 Father's Day Finds,  I used it for the fishing pole, lure, and fish.  I doubled these up for strength. They were colored in using Spectrum Noir markers, accented with a white gel pen.  

The backgrounds were inked with Faded Jeans Distress Oxide inks and spotted with water.  The igloo was totally free hand, and meant to be just a mock up, but I kind of liked the whimsy of it and kept it.

  The flag was made with a toothpick colored with a silver sharpie, and a banner made out of a stamped image that I have no idea where it came from, and I cut some some tag ends on it.  A little red pompom, and Voila', a flag! 

The ear muffs!  Ah.....easily one of my favorite inspirations for this card...wire, wrapped around the afore mentioned toothpick, then stretched out slightly.  The "muff" parts were part from a retired Santa hat die (1040 props 5).  I sandwiched the wire between 2 muffs, then glues the muffs to Chilly's head.   The Sentiments were computer generated.

So the only "weird/different" thing about this card was that I had to put the mechanism pretty much at the bottom of the card so that the fishing pole wasn't sticking out the top of the card.  I used the igloo instead of the square to cover the mechanism, and built out a scene for the pond and glued the pole & the fish to it.  This made the card want to "over-open" a little, (Chilly was slanted downhill a bit) so behind the igloo (on the lower right) I glued a hook from a hook and eye set to work as a "stop".  I must say, It works pretty darned good!  

A little Wink of Stella here and there, and we have another card!

This card was a Blast to make!  I like having to improvise and make up stuff.  It seems to personalize the card more, and challenges me. 

 I hope this inspires you to try different things!

ttfn:
Karen