In my last Blog, I talked about mock-ups, and their importance in designing cards. I posted a picture of the mock-up design for this Halloween card. Now you'll get to see the final results.
This was one time I was really glad to have a mock-up to follow. This was a complex card, in that there were multiple pop-up elements. I had a SquareSpinner Pop-up (Karen Burniston Die), a floating floor, and a small pop-up from another one of Karen Burniston's sets. Oh, and I turned the entire card on it's side.
 |
| Card Front The card front is made from a combination of die cut images, and inked images. |
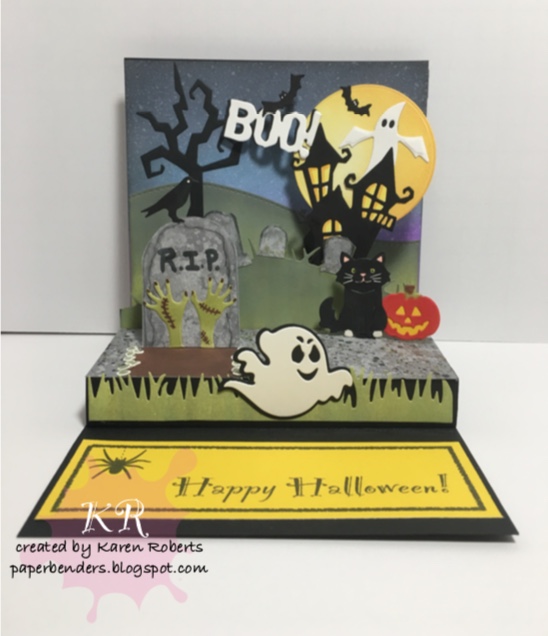 |
| Inside |
 |
| Left Side Detail Here you can see most of the pop-up elements on the left side of the card |
 |
| Right Side Detail Here you can view the pop-ups from the Right hand side. |
 |
| Inside Detail Here is a close up of the detail on the top of the card.
If you want some of the details on how this was made, you might want to grab the beverage of your choice at this time. This might get a little long winded, but I want to be fairly detailed, that way if you're adventurous, you might be inspired to try something like this.
|
I did a 5 1/2" x 5 1/2" card base.
First off was the spinner card. There are GREAT instructions from Karen Burniston on both her web page, http://karen burniston.com and also on YouTube, so I don't need to get into that here. She explains it WAY better than I could, and you can follow along with the videos.
I inked my background paper, and glued it to a card base. I then added a grassy hill (die cut edges, then inked with Distress Oxides). I then needed to attach the spinner mechanism.
So I created the spinner mechanism for the card, attached it about 1 1/4" from the right edge of the card. I wanted to add another grassy hill, but needed a support on the left side, so I cut out another spinner card mechanism, and used the box portion only, and glued it to the left side of the card.
To these platforms, I added the hill with tombstones (die cut, then inked using distress oxides and masking technique). Pretty straight forward so far. Now comes the floating floor.
I cut a 4 1/4" x 5 1/2" piece of grey card stock. On the 4 1/4" side, I scored @ 3/4", 1 1/2", & 3 1/2". I cut a slot on the left side of the platform (for the large tombstone), and did a diagonal pop up on the right side (behind the cat and the pumpkin).
I attached the floating floor, then decorated it as follows:
I inked "gravel", and "dirt" onto grey cardstock, then glued that onto the platform, lined the grave with "rocks" made from small waste pieces of a die (I did stencil ink on the die before removing the individual pieces). I attached the large tombstone, the cat & the pumpkin. I edged the front of the platform with grass and a ghost.
The sentiment at the bottom was computer generated.
Let me know what you think of this card. It was a lot of fun to design, and assemble.
Spooktacular card! Creative genius at work. So many wonderful details. Love, love this card!
ReplyDelete